How to Clear CMOS


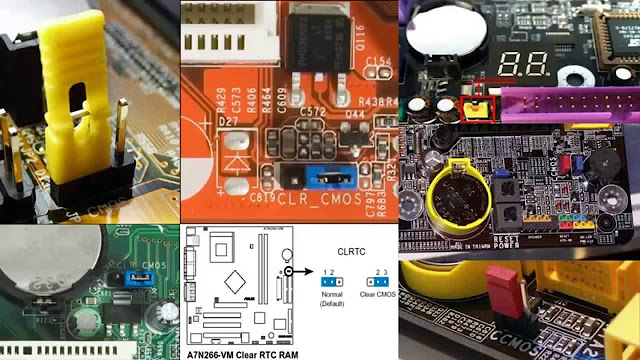
Clearing the CMOS on your motherboard will reset your BIOS settings to their factory defaults, the settings that the motherboard maker decided were the ones that most people would use.
One reason to clear CMOS is to help troubleshoot or solve certain computer problems or hardware compatibility issues. Many times, a simple BIOS reset is all you need to get a seemingly dead PC back up and running.
You might also want to clear CMOS to reset a BIOS or system-level password, or if you've been making changes to BIOS that you suspect have now caused some kind of problem.
Below are three very different ways to clear CMOS. Any one method is as good as any other but you may find one of them easier, or whatever problem you might be having may restrict you to clearing the CMOS in a particular way.
Important: After clearing the CMOS you may need to access the BIOS setup utilityand reconfigure some of your hardware settings. While the default settings for most modern motherboards will usually work just fine, if you've made changes yourself, like those related to overclocking, you'll have to make those changes again after resetting BIOS.

1
Clear CMOS With the "factory Defaults" Option

Screenshot showing the menu options available in the Exit area of a particular version of PhoenixBIOS
 Exit Menu Options (PhoenixBIOS).
The easiest way to clear the CMOS is to enter the BIOS setup utility and choose to Reset BIOS Settings to their factory default levels.
The exact menu option in your particular motherboard's BIOS may differ but look for phrases like reset to defaultfactory defaultclear BIOSload setup defaults, etc. Every manufacturer seems to have their own way of wording it.
The BIOS Settings option is usually located near the bottom of the screen, or at the end of your BIOS options, depending on how it's structured. If you're having trouble finding it, look close to where the Save or Save & Exit options are - they're usually close to those.
Finally, choose to save the settings and then restart the computer.
Note: The directions I linked to in the heading above detail how to access your BIOS utility but do not specifically demonstrate how to clear the CMOS in your BIOS utility. It should be easy enough, however, as long as you can find that reset option.

Clear CMOS by Reseating the CMOS Battery

Photo of a CMOS battery and enclosure found in many laptop and tablet computers
 P-CR2032 CMOS Battery. © Dell Inc.
Another way to clear CMOS is to reseat the CMOS battery.
Start by making sure your computer is unplugged. If you're using a laptop or tablet, make sure the main battery is removed too.
Next, open up your computer's case if you're using a desktop PC, or find and open the small CMOS battery panel if you're using a tablet or laptop computer.
Finally, remove the CMOS battery for a few minutes and then put it back in. Close the case or battery panel and then plug in, or reattach the computer's main battery.
By disconnecting and then reconnecting the CMOS battery, you remove the source of power that saves your computer's BIOS settings, resetting them to default.
Laptops & Tablets: The CMOS battery shown here is wrapped inside a special enclosure and connects to the motherboard via the 2-pin white connector. This is an increasingly common way that manufacturers of small computers include a CMOS battery. Clearing CMOS in this case involves unplugging the white connector from the motherboard and then plugging it back in.
Desktops: The CMOS battery in most desktop computers is much easier to find and looks just like a standard cell-type battery like you'd find in small toys or traditional watches. Clearing CMOS in this case involves popping the battery out and then putting it back in.
Never opened up your desktop computer before? See How to Open a Desktop Computer Case for a complete walkthrough.

3
Clear CMOS Using This Motherboard Jumper

Close-up photo of a 'CLEAR CMOS' jumper on a motherboard
 CLEAR CMOS Jumper.
Yet another way to clear the CMOS is to short the CLEAR CMOS jumper on your motherboard, assuming your motherboard has one.
Most desktop motherboards will have a jumper like this but most laptops and tablets will not.
Make sure your computer is unplugged and then open it up. Look around your motherboard's surface for a jumper (as shown in the picture) with the CLEAR CMOS label, which will be located on the motherboard and near the jumper.
These jumpers are often located near the BIOS chip itself or next to the CMOS battery. Some other names by which you might see this jumper labeled include CLRPWDPASSWORD, or even just CLEAR.
Move the little plastic jumper from the 2 pins it's on over to the other pins (in a 3-pin setup where the center pin is shared) or remove the jumper entirely if this is a 2-pin setup. Any confusion here can be cleared up by checking the CMOS clearing steps outlined in your computer or motherboard manual.
Turn back on the computer and make sure that the BIOS settings have reset, or the system password is now cleared... if that's why you were clearing CMOS.
If everything is good, turn off your computer, return the jumper to its original position, and then turn the computer back on. If you don't do this, CMOS will clear on every restart of your computer!