PowerPoint is a presentation software. A presentation consists of a number of slides. We often display (show) information on a topic using a slide show. In a slide show, pages called slides are shown on after the other. A slide may have text, pictures, videos, and so on. A collection of slides on a topic is called Presentation. PowerPoint is a program we use to make and show presentations.
To start PowerPoint, click in this order:
1) Start 2) All Programs 3) Microsoft Office 2013 4) PowerPoint 2013

You may start a new presentation by clicking on Blank Presentation. The new presentation will open in the window shown below:

Let us learn about the main parts of this window:
Quick Access Toolbar: This toolbar has commonly used commands like Save, Undo, Repeat and Start From Beginning. Next to these commands is a down-arrow. Click on this arrow to get a list of commands you can add to this toolbar.
Ribbon: The Ribbon has tabs for different tasks. Each tab has groups of commands or tools. Some groups have a dialog box launcher ![]() .
.
Clicking on it opens a dialog box which has more options (Choices) for us to select.
Select Navigation Pane: This pane on the left shows the thumbnails (small pictures) of all the slides in the presentation. You can add, delete, duplicate and arrange slides from this pane.
Slide Pane: This pane is usually the largest part of the window. It shows the slide selected in the Slide Navigation pane. In this pane, we add text, pictures, and so on, in the slide.
Viewing options: Slides in the presentation can be viewed (seen) in different ways. The common viewing options are found in the task bar below the Slide pane.
- Normal view (
 ) is the default. It is used while working on a slide.
- Slide Sorter view (
 ) shows slide thumbnails. In this view, you can add, delete, duplicate and arrange slides from the Slide pane.
- Reading view (
 ) hides all the tools and shows the slide alone.
- Slide Show (
 ) shows the slide one by one, starting from the current slide.
Zoom control: It can be used to get a larger or smaller view of the slide in the work area.
Placeholders: These are dotted boxes for holding text, pictures, etc. The text of a placeholder indicates the look of the text that will go in the box. It also tells the user what is to be done.
For example, it might say "Click to add title". When a user clicks and types in this box, the text becomes the title of the slide.
File tab: The File tab is used for managing PowerPoint files (presentations). It opens a screen that lets you do things like make, open, save and print presentations. This screen is called the Backstage view. It is shown below:

Creating a New Blank Presentation
- Click the File tab.

- In the Backstage view click New.
- Click on Blank Presentation.

Adding Text
You can add text to slide and format it. The formatting of text in PowerPoint is similar to the formatting of text in Word. You can change the font, font size and colour. You can make the text bold, italic and underlined. You can also add effects like shadow to the text.
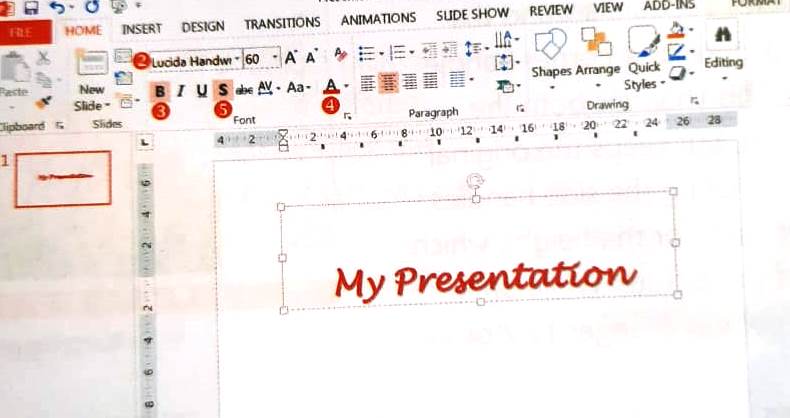
- Click on the text placeholder and type in "My Presentation". The text will appear in the style of the placeholder. You may want to change its look as follows, using the options in the Font group on the Home tab.
- Select the text. Click on the down-arrow of the Font box and choose a font.
- Click on Bold (B).
- Click on the down-arrow of Font Colour
 and choose the colour red.
 - Click on Text Shadow (S)to add a shadow behind the text.
- Use
 to make a bulleted list. Use
  to make a numbered list.
- Use
 and
and  to change the amount of indentation of the text.
- Use
 to align text.
- Use
 to set the direction of the text, like rotated to face the slide margins.
- Use
 to align the text within the text box, for example, to the top or centre of the box.

- Click on the Insert tab.
- Click on Pictures. This will open the Insert Picture dialog box.
- Locate the picture you want and double-click it. This will put the picture in the slide.


A border with square sizing handles appears around the picture. Drag the picture by a corner handle to change its size. This changes both the width and the height, but keeps the original shape of the picture. Using the side handles changes either the width or the height, which spoils the shape of the picture. While on a sizing handle, the pointer changes to double arrow pointer.

To rotate it, click and drag the curved arrow at the top of the picture. The pointer changes to

- Click the lower New Slide command in the Slides group on the Home tab or Insert tab.
- You will get a menu with different slide layouts. A slide layout usually has placeholders in different positions for text and other content, like pictures and videos. Let us choose the layout Title and Content. A new slide with this layout is added to the presentation.
- Click the upper placeholder and type in the title of the slide. You can format the title if you wish.
- Let us learn another way of adding a picture.
The lower placeholder has icons of different things such as pictures and videos. Click the icon for pictures. You will get the Insert Picture dialog box. Select the picture to add.
- Keyboard shortcut : Ctrl + M
- Right-click on the Slide Navigation pane on the left and choose New Slide.
- Click the Design tab.
- Click Format Background in the Customize group. The Format Background pane will appear. You can also get here by right-clicking on the Slide pane.
- Click Solid fill.
- Click Fill Colour and then choose a colour. This will be the background colour of the selected slide.
- To apply the colour to all slides, click Apply to All.
- Click the Design tab. You will see a row of theme thumbnails.
- Click the More button to see more themes in the gallery.
- Point to different themes and see how the look of your slide changes. Click on a theme to apply it to all the slides and change their look.
- To start a slide show from the beginning, press the F5 key.
- You can go to the next slide by clicking the mouse, or by pressing the Enter key or the Spacebar on the keyboard.
- Click the File tab. The Backstage view appears.
- In the Backstage view click Save. For a new presentation, you will get the Save As pane.
- Click on Computer.
- Now choose the location on the computer where you want to save the presentation file. The location could be a folder. If you do not see the location you want, click on Browse. Clicking on Browse or on a folder opens the Save As dialog box.
- Select the location where you want to save the file.
- Type the name of the file.
- Click Save to save the file.
- To save a file, you can also click the Save Command on the Quick Access Toolbar.
- The keyboard shortcut for Save is Ctrl + S.
- Click the File tab to open the Backstage view. There, click Open.
- To find the file on the computer, first click Computer.
- Then click Browse. This will show the Open dialog box.
- Choose the location of the file.
- Click on the file or you can double-click on the file to open it.
- Click Open to open the file.
- Click the File tab.
- In the Backstage view click Close. This will close the presentation file without closing PowerPoint. To close PowerPoint, click on the (X)button at the top of the window.
Recap
- PowerPoint 2013 is a program that we use to make and show presentations.
- The Ribbon has tabs for different tasks. Each tab has groups of commands or tools.
- The File tab is used for managing presentation files. Clicking on it opens the Backstage view, which has commands like New, Save, Open and Print.
- We work on slides in the Slide pane. To its left is the Slide Navigation pane that shows all the slides. We can add, delete, duplicate and arrange (order) slides in the Slide Navigation pane.
- A new slide usually has placeholders for different types of content. The text added to slides can be formatted. Pictures can be resized, moved and rotated.
- We can apply a theme to selected slides or all slides to give them a particular look.
- A presentation is shown by starting a slide show, in which slides are shown one after the other.

)
0 Comments